
TL;DR:
- Registering as an online tutor involves submitting your identity, qualifications, and teaching profile to platforms like Preply, Wyzant, or Tutoroo. Success depends on thorough preparation, honesty, and a compelling introduction video that builds trust with potential students.
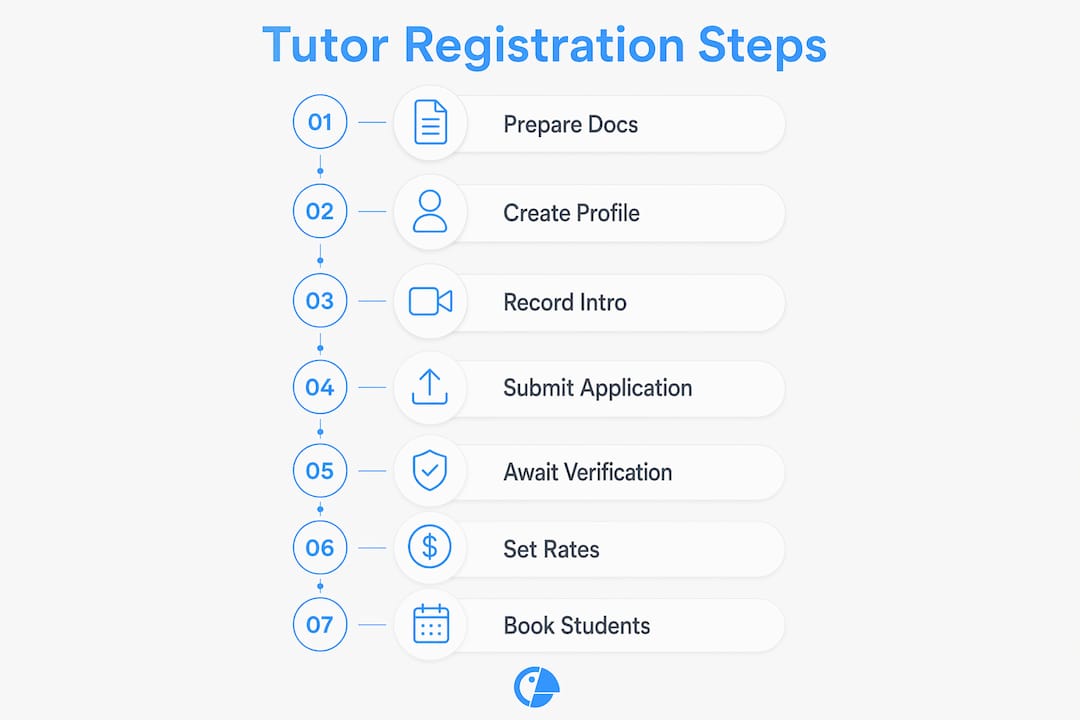
Step by step tutor registration is the process of joining an online tutoring platform by submitting your credentials, identity verification documents, and a profile that showcases your teaching skills and approach. For language tutors, this process opens doors to culture, connection, and opportunity on a global scale. Platforms like Preply, Wyzant, and Tutoroo each have their own requirements, but the core workflow follows the same pattern: choose your niche, verify your identity, build your profile, and set your rates. Getting each stage right from the start dramatically improves your chances of approval and your first bookings.
What prerequisites and documents do you need before starting tutor registration?
Preparation is the difference between a smooth application and a frustrating restart. Before you begin the tutor application process on any platform, gather these materials:
- Government-issued photo ID. A passport or driver's licence is standard. Platforms review this to confirm your identity before activating your profile.
- Proof of qualifications (if applicable). A degree certificate or language proficiency result strengthens your application, though formal teaching degrees are not strictly required on most platforms. Subject expertise matters more than credentials for many language roles.
- A current CV or résumé. List your teaching experience, languages spoken, and any relevant courses or certifications.
- A professional headshot. Clear, well-lit, and friendly. Students make split-second decisions based on profile photos.
- A short introductory video. This is your most powerful asset. Profiles with a polished intro video receive 3.6 times more trial bookings than those without. Record in a quiet, well-lit space and speak directly to potential students.
Defining your niche before you register is equally critical. Tutoring success depends heavily on clearly identifying your subject and level before you fill in a single form. Are you teaching conversational Spanish to beginners, or business Mandarin to professionals? The more specific your answer, the more relevant your student matches will be.
Pro Tip: Film your intro video in landscape mode on a smartphone with good natural light. Speak for 60–90 seconds, introduce yourself, name the language you teach, and describe one concrete outcome students can expect from your lessons.

How to complete the step by step application and profile creation
The actual tutor sign up guide on most platforms follows a numbered sequence. Work through each stage carefully rather than rushing to submit.
- Create your account. Enter your name, email address, and password. Some platforms ask for your country of residence at this stage.
- Choose your teaching subject and level. Select the language or languages you are genuinely qualified to teach. Be honest and specific. Listing a language you cannot professionally teach is a primary reason for rejection.
- Write your profile headline. Keep it to one sentence. Name the language, the student type, and one key benefit. Example: "Native French speaker helping adult beginners build real conversational confidence."
- Write your profile description. Describe your teaching approach, your background, and what a typical lesson looks like. Use concrete language. Avoid vague phrases like "I am passionate about teaching."
- Upload your qualifications and CV. Attach relevant certificates or a résumé. Even without a formal degree, a well-organised CV signals professionalism.
- Upload your government-issued ID. Human reviewers check this document. ID verification typically takes 24–72 hours to complete.
- Upload your introductory video. This is the step most new tutors underestimate. A clear, warm, well-structured video builds immediate trust with prospective students.
- Set your hourly rate. New tutors generally start in the $15–$35 per hour range, depending on subject and platform. Set a rate that reflects your experience without pricing yourself out of early bookings.
- Submit your application. Review everything before you click submit. Incomplete profiles are a common reason for modification requests.
Pro Tip: Write your profile description with a specific student goal in mind. Instead of "I help students learn Spanish," write "I help working professionals hold a 10-minute conversation in Spanish within eight weeks." Concrete goals attract students who are ready to commit.
What are common pitfalls during tutor registration and how do you avoid them?
Most tutor applications do not sail through on the first attempt. Approximately 60% of applicants are approved immediately, 30% receive feedback and modification requests, and 10% face outright rejection. Knowing why applications fail puts you ahead of the majority.
The most common rejection triggers are:
- Inaccurate language proficiency claims. Platforms test or verify claimed languages. Overstating your level leads to immediate rejection.
- Poor video quality. Background noise, bad lighting, or a shaky camera signals a lack of preparation. Students notice.
- Incomplete profile sections. Leaving the description, qualifications, or teaching approach blank gives reviewers nothing to approve.
- Generic descriptions. Profiles that read like a template get passed over. Specificity builds trust.
"Treat your registration profile as your first lesson. If you cannot communicate clearly on a static page, students will not trust you to communicate clearly in a live session."
If your application comes back with a modification request, respond within 48 hours. Reread the feedback carefully, update the flagged sections, and resubmit. If you receive an outright rejection, take time to re-record your intro video, rewrite your description with more specific detail, and review your credentials before reapplying. A stronger second application succeeds far more often than a rushed resubmission.
How to set your rates and book your first students after registration
Pricing is where many new tutors make their first mistake. Experts advise new tutors to start slightly below the average rate for their subject and level. This attracts the first wave of students quickly and creates the review history that drives future bookings.
Follow this sequence to build momentum after approval:
- Set a competitive opening rate. Research what tutors with similar experience charge on your chosen platform. Start 10–15% below that figure for your first five to ten students.
- Prepare your first lesson thoroughly. The first lesson sets the tone for the entire relationship. Prepare diagnostic questions, teach one clear concept, and summarise next steps at the end. Students who feel progress in lesson one book lesson two.
- Ask for a review immediately after a successful session. Asking satisfied students for a review right after a good lesson is the single fastest way to improve your visibility in platform search results. Do not wait. Send a short, friendly message the same day.
- Use scheduling and communication tools from day one. Google Calendar, Zoom, and a simple spreadsheet reduce no-show rates and keep your sessions organised. Students who receive reminders show up more reliably.
- Raise your rate after ten positive reviews. Once you have a track record, increase your hourly rate in small increments. A tutor with fifteen five-star reviews can comfortably charge the platform average or above.
Pro Tip: After each session, send a two-sentence follow-up message. Summarise what the student achieved and name the topic for the next lesson. This small habit dramatically improves rebooking rates.
For more detail on monetising your tutoring skills, including how to price for different student types, Tutoroo's blog covers the full picture.
How do popular tutoring platforms compare for registration?
Choosing the right platform shapes your entire experience as a new tutor. The table below compares three widely used platforms on the factors that matter most during the tutor enrollment process.
| Platform | Commission | ID verification time | Degree required? | Niche availability |
|---|---|---|---|---|
| Preply | 33%–100% (sliding scale) | 24–72 hours | No | Languages, maths, test prep |
| Wyzant | 25% | 24–48 hours | No | Broad subjects, languages |
| Tutor.com | 15%–40% | 24–72 hours | Varies by subject | School subjects, languages |
Platform commissions typically range from 15% to 40%, though Preply's sliding scale starts higher for new tutors and decreases as you complete more hours. That structure rewards loyalty and consistency.
If you prefer to keep 100% of your earnings, running an independent tutoring practice is an option. The trade-off is that you handle your own marketing, scheduling, and payment processing. For most new language tutors, starting on an established platform builds confidence and a client base faster than going it alone.
Key takeaways
A successful tutor registration process depends on preparation, an honest profile, and a compelling introductory video that converts profile views into booked lessons.
| Point | Details |
|---|---|
| Prepare documents first | Gather your ID, CV, and qualifications before opening the registration form. |
| Intro video drives bookings | Profiles with a polished video receive 3.6 times more trial bookings than those without. |
| Be honest about languages | Listing languages you cannot professionally teach is the leading cause of rejection. |
| Start rates competitively | Begin slightly below the platform average to attract early students and build reviews. |
| Ask for reviews immediately | Requesting a review right after a successful session accelerates your platform visibility. |
Tutoroo's perspective on registering as a language tutor
The part of the registration process that surprises most new tutors is how much the introductory video matters. We have seen tutors with impressive qualifications get overlooked because their video felt flat or rehearsed, while tutors with modest credentials booked up quickly because their video felt warm, direct, and genuine. The video is not a formality. It is your first real teaching moment, and students are watching to see whether they trust you before they spend a cent.
The other thing worth saying plainly: niche clarity changes everything. Tutors who register as "English teachers" compete with thousands of others. Tutors who register as "English conversation coaches for Korean professionals preparing for job interviews" attract exactly the right students and convert at a much higher rate. The registration form asks you to define yourself. Take that question seriously.
Persistence matters too. A modification request is not a rejection. It is feedback. The tutors who treat that feedback as a coaching note, update their profiles thoughtfully, and resubmit with a stronger video are the ones who build thriving practices. The process rewards those who approach language tutoring as a genuine craft, not just a side income.
— Tutoroo
Start your tutor registration with Tutoroo
Tutoroo connects over 386,000 language tutors with students worldwide, offering one-on-one lessons online or in person across languages including English, Spanish, French, Arabic, and Chinese.
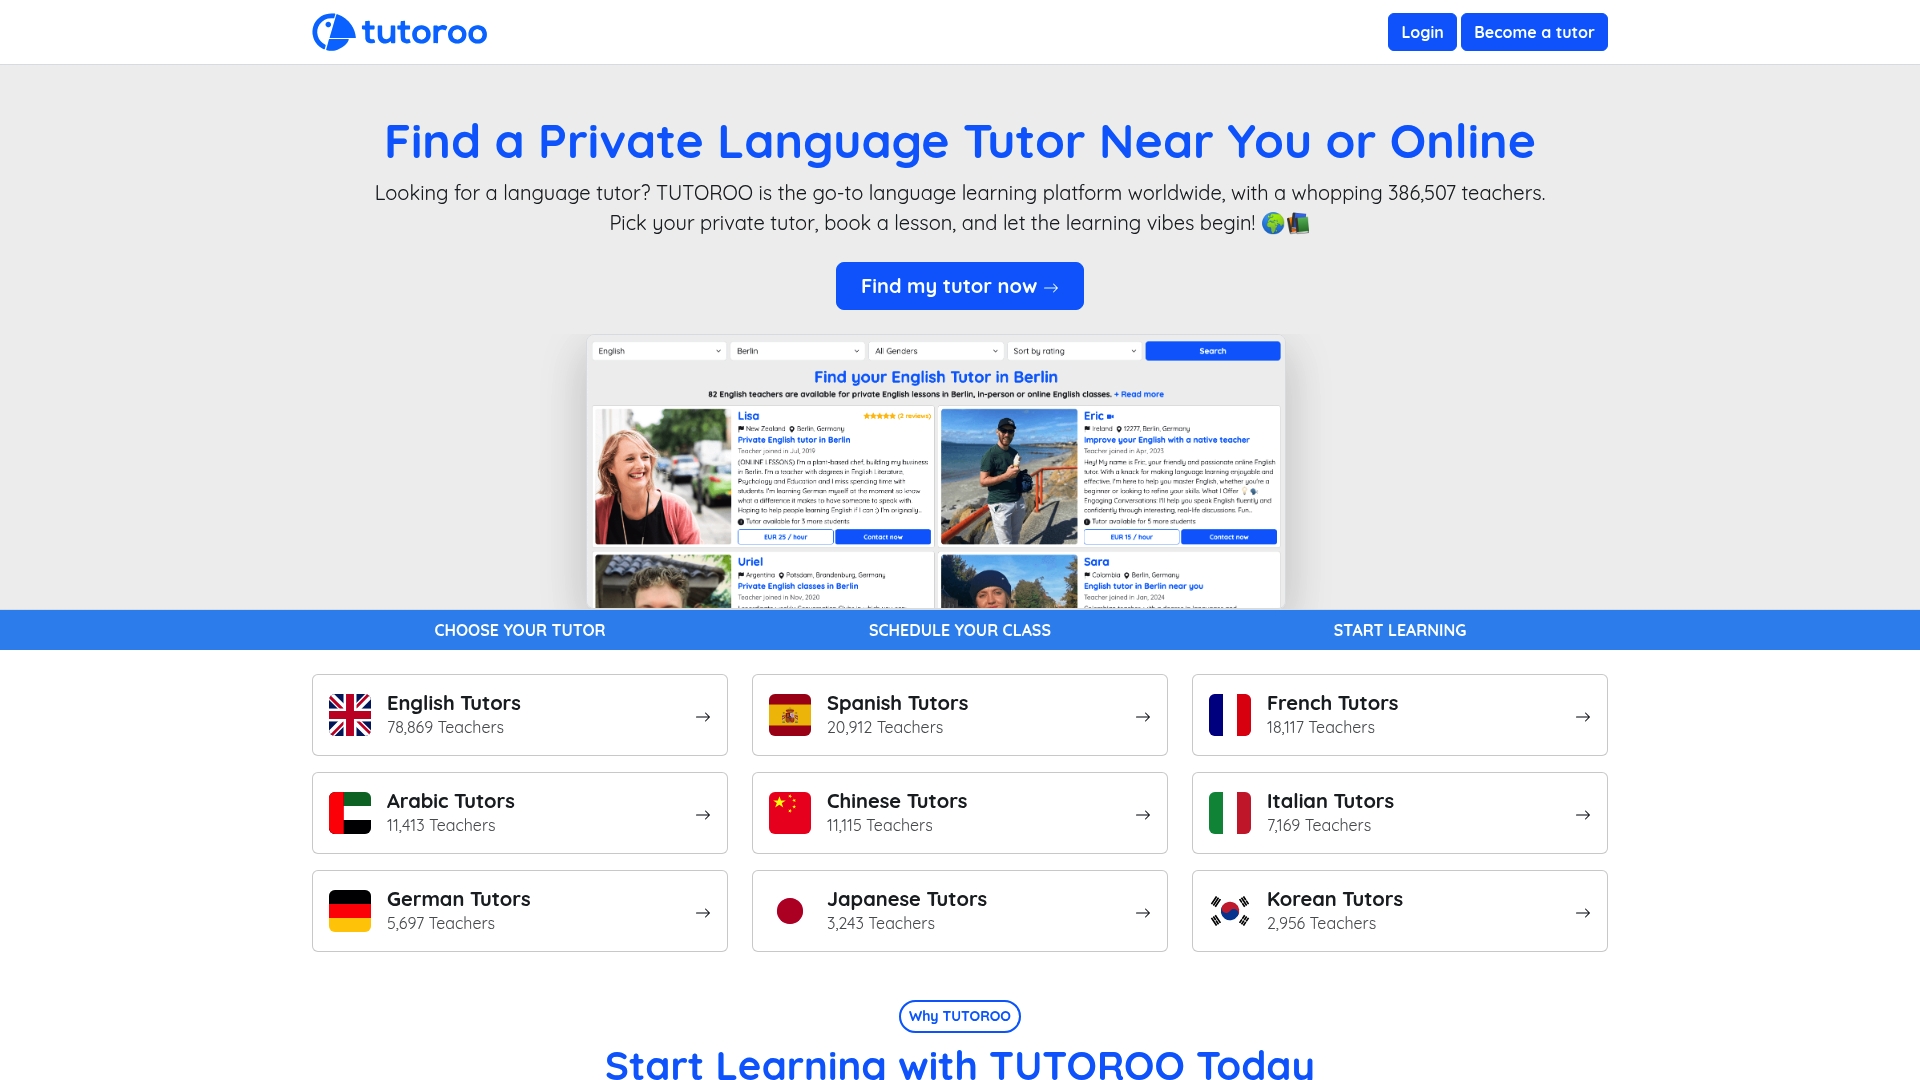
Registration on Tutoroo is straightforward. You set your own schedule, receive direct payments from students, and keep control of your teaching practice from day one. The platform's matching system puts your profile in front of students who are actively searching for your language and experience level. Whether you are teaching conversational French or business Mandarin, Tutoroo gives you the reach and the tools to build a rewarding tutoring career. Register as a tutor today and connect with students who are ready to learn.
FAQ
What documents do I need to register as a tutor online?
Most platforms require a government-issued photo ID, a current CV, and an introductory video. Degree certificates strengthen your application but are not mandatory for most language tutoring roles.
How long does tutor ID verification take?
Identity verification typically takes 24–72 hours on platforms like Preply and Wyzant, as human reviewers check submitted documents before approving profiles.
What is the approval rate for first-time tutor applications?
Approximately 60% of applicants are approved on their first attempt, 30% receive modification requests, and 10% are rejected outright.
Why was my tutor application rejected?
The most common reasons are inaccurate language proficiency claims, poor video quality, and incomplete profile sections. Resubmitting with an improved video and a more specific profile description resolves most rejections.
How do I get my first students after registration is approved?
Set your rate slightly below the platform average, prepare thoroughly for your first lesson, and ask satisfied students for a review immediately after each session. Reviews are the single biggest factor in improving your visibility in platform search results.